


In our previous posts we discussed about installation and initial configuration of Storevirtual nodes using CMC(Centralized Management Console). In this article we will see management group and cluster configuration using CMC.
Creating a management group, is it that difficult ?
Creating a management group is the first step in the process of creating clusters and volumes using StoreVirtual storage. There are multiple ways through which you can create a management
group and cluster. First method is to start the Management Groups, Clusters and Volumes Wizard using the Getting Started Launch Pad. The other option is to access "New management Group" option from the tasks main menu.
We are using "New management Group" option from the tasks main menu. option here.

When naming a management group, ensure that you do not use the name of an existing management group. Doing that may cause the nodes on the existing management group to be initialized and any data on those cluster nodes to be permanently deleted. It gives you a warning by the way!

Click Next to begin

Select "New" to create a new management group and click Next.

Now it is time to enter a name for the new management group.Give a proper name, because you wont be able to edit the management group name without deleting/destroying the management group.Select the storage system(s) from the list which you want to be part of the management group. Use Ctrl+A or Ctrl+Click to select multiple nodes. if you are planning to build a cluster with 2 nodes, you must select a failover manager or a quorum witness which will help to influence majority or managers while taking data distribution decisions.
Click Next once you are done.
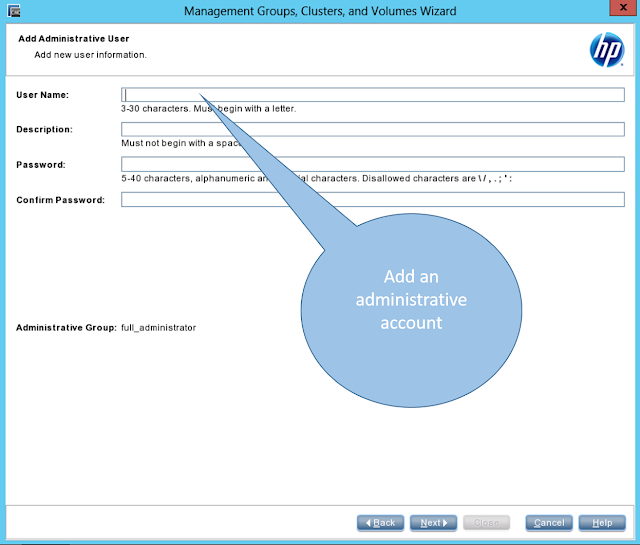
The next screen will take to add administrators. You can mention an admin account which will be primarily used for creating the cluster and modifying the settings. You may add more uses later.

The next screen will advice you to add NTP server details. It is highly recommend to add NTP server details to have time synchronization in place. if you don't have an NTP server edit the time manually.
Click Next once you are done!

Setup the DNS details by entering the DNS domain, suffix, and server IP address. If you are using NTP server, you must add DNS details to have proper name resolution.Click Next once you good to go.

Next screen will ask you to enter the email (SMTP) server IP address or host name, port number and email address to use for the sender for event notification. Key in details and Click Next.
Storage Cluster will begin once you click next

This screen will ask you to select the cluster type standard or multi-site. In this example as we are creating a standard cluster, select standard cluster and click Next to continue.

Enter the cluster name and select cluster nodes which are going to be part of this cluster. Then click Next to continue.

This screen will ask you to add cluster VIP, to complete that action click "add" a pop up window will appear. Storage cluster will be using this VIP for volume discovery purpose.
Enter cluster Virtual IP (VIP) and subnet mask and click OK. This will take you back to the cluster VIP screen, click Next to proceed to next scree.

We are not going to create a volume now so we have to skip the volume creation process by selecting skip volume creation. Click finish once done.

This will take you a confirmation screen. you may save it for future reference and close the screen,
You are done with cluster creation!!
As a user, I found this step-by-step guide on HPE StoreVirtual configuration using CMC incredibly helpful and informative. The detailed instructions make it easy to navigate through the setup process, ensuring a smooth experience for users of all levels of expertise. Moreover, as someone interested in high-quality server solutions, I appreciate the mention of HPE DL385 Gen11, a powerhouse server known for its reliability and performance. For those looking to optimize their storage solutions and streamline their operations, Esaitech offers a wide range of options, including the HPE DL385 Gen11, ensuring users can find the perfect fit for their needs.
ReplyDelete