


In recent past we have been involved in multiple projects and the most interesting one was multi-node HP StoreVirtual 4730 implementation. The entire setup had multiple sites involved and took more time than expected as we ran into some issues during the implementation.
In this series, we will explore the installation and configuration of HP StoreVirtual 4730. HP StoreVirtual Storage systems are basically scale-out storage platforms which are designed to meet the constantly changing needs of virtualized environments. These storage nodes are based on the LeftHand operating(SAN i/Q) systems and meet the need for simplicity and flexibility in today's virtual data centers.
In this first section we will demonstrate the node configuration using ILO. Once the hardware is racked and stacked, ensure all cables are properly inserted, connect the power cord and power on the storage system. if you have ILO, ensure to setup an ILO IP address and rest of the things can be done remotely.
Connect to ILO and access remote console option


Once you have done with the Hostname, next step is to enter the node IP address. To do that. use tab key and then select Use the following IP address option.

Then key in details for the IP address, subnet mask, and gateway. Select OK when finished and press Enter.

When you see the confirmation screen, Select "OK" using tab and press Enter to continue.

Once the IP address is set, you will see a confirmation screen along with the IP address information. Select OK and press Enter to continue.

Repeat the same steps if you have multiple nodes and complete the node configuration.
To be continued!
In this series, we will explore the installation and configuration of HP StoreVirtual 4730. HP StoreVirtual Storage systems are basically scale-out storage platforms which are designed to meet the constantly changing needs of virtualized environments. These storage nodes are based on the LeftHand operating(SAN i/Q) systems and meet the need for simplicity and flexibility in today's virtual data centers.
In this first section we will demonstrate the node configuration using ILO. Once the hardware is racked and stacked, ensure all cables are properly inserted, connect the power cord and power on the storage system. if you have ILO, ensure to setup an ILO IP address and rest of the things can be done remotely.
Connect to ILO and access remote console option

Select appropriate option, either .NET or Java and click "Launch".
Before logging in, ensure that you have the following information available with you for easy configuration.
• Host names(FQDN)
• IP addresses, subnet mask, and gateway details
To log in to the configuration interface, type start,and then press Enter. To login to the configuration interface press Enter again.
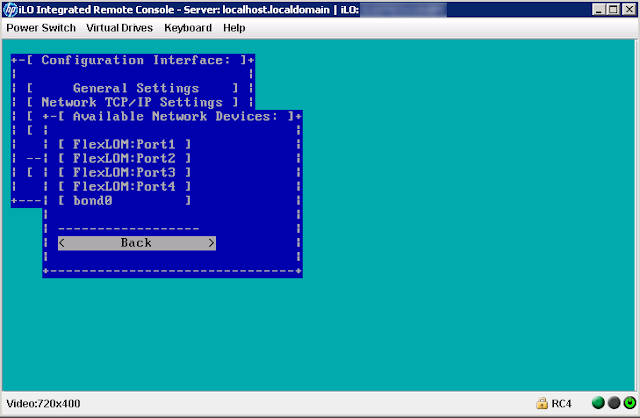
Once you are logged in to the configuration interface, Press Tab to select Network TCP/IP settings and press Enter again to start the interface selection.

Keep pressing Tab to select the appropriate network interface which you want to configure and press Enter to continue. If you want to go back to the main menu, Press Tab and select Back and press Enter.

To change the host name, press back-space or arrow combination to delete the entry and then you can enter the desired node name. The best practice is to enter FQDN for easy setup.

Once you have done with the Hostname, next step is to enter the node IP address. To do that. use tab key and then select Use the following IP address option.

Then key in details for the IP address, subnet mask, and gateway. Select OK when finished and press Enter.

When you see the confirmation screen, Select "OK" using tab and press Enter to continue.

Once the IP address is set, you will see a confirmation screen along with the IP address information. Select OK and press Enter to continue.

Repeat the same steps if you have multiple nodes and complete the node configuration.
To be continued!
ReplyDeleteThank you for your feedback. We're glad you enjoyed the post. Feel free to share it with others you think may benefit from this information.
123 HP Setup
ReplyDeleteI am really impressed along with your writing skills and also with the format on your blog.
HP Envy 5540 Wireless Setup
Thanks for the informative blog...
ReplyDeleteHP Envy 5533 Driver
Thank you for putting an effort to published this article. You've done a great job! Good bless!
ReplyDeletehp envy 5540 scan to computer
Thank you for the insights offered in the article. Looking for more such pieces. Visit our sites for printer setup & support.
ReplyDelete123.hp.com || 123.hp.com/setup || 123HP Setup || hp.com/setup || hp.com/123 || 123.hp.com setup || 123 HP Printer Setup || 123 HP Printer Support || 123 HP Setup and Install || 123hpcom || 123 HP Printer Install || 123hpcomsetup || 123 HP Wireless Setup || 123 HP Install || hpcom/123 || 123hpcominstall || 123HP Setup || 123 HP Smart App || Install 123 HP Printer || HP 123 Setup Scanner
Nice information. Thanks for sharing content and such nice information for me. I hope you will share some more content about. Please keep sharing!
ReplyDelete123 HP Envy 5540 Setup
Nice post which is very informative..!! Thanks for sharing, Check out our site..!!
ReplyDelete123 HP Com Ojpro9015